 Save
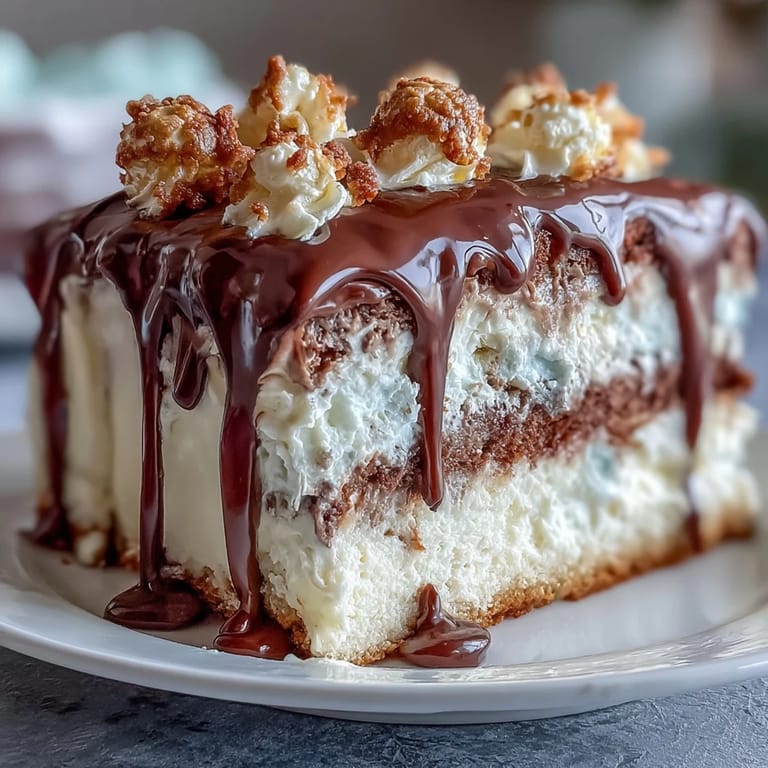
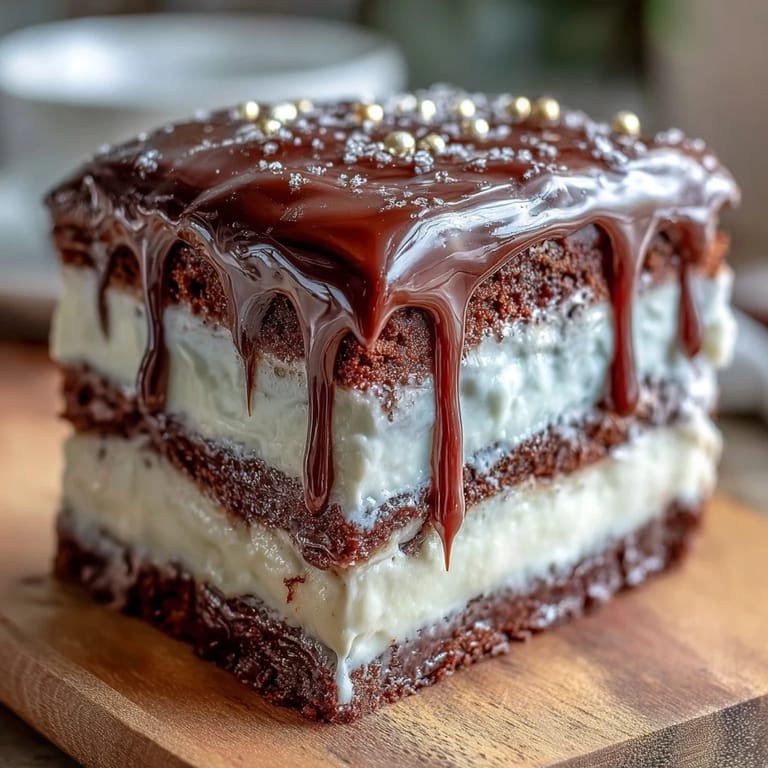
Save My friend texted me a photo of her graduation cap mid-throw, and I knew exactly what I had to bake. There's something about white chocolate that feels celebratory without trying too hard—elegant but not stuffy. This cake came together one afternoon when I realized that milestone moments deserve more than just a pretty dessert; they deserve something that tastes as good as it looks. The combination of tender vanilla sponge, silky buttercream, and that dramatic white chocolate drip somehow says everything a card never could.
I made this cake for my neighbor's daughter, and I'll never forget how quiet the room got when I set it down on the table. Everyone just stared for a moment before someone asked for a slice. That's when I knew I'd nailed it—when the cake itself becomes the conversation starter, and people feel celebrated just by being in its presence.
Ingredients
- All-purpose flour (2 ½ cups): The foundation of a tender crumb; make sure you spoon and level rather than scoop directly from the bag.
- Baking powder (2 ½ tsp): Essential for lift; check the date on your container because old baking powder won't give you those airy layers.
- Salt (½ tsp): A pinch that makes the vanilla sing without making anything taste salty.
- Unsalted butter (1 cup for sponge, 1 cup for buttercream): Room temperature is non-negotiable; cold butter won't cream properly and will leave you with a dense cake.
- Granulated sugar (2 cups): This dissolves into the batter and creates the structure that keeps layers moist.
- Large eggs (4): Room temperature so they incorporate smoothly and create lift throughout the cake.
- Pure vanilla extract (1 tbsp for sponge, 1 tsp for buttercream): The quiet backbone of flavor that lets everything else shine.
- Whole milk (1 cup): Room temperature milk helps the batter combine smoothly and keeps the crumb tender.
- Powdered sugar (4 cups): Always sift this to avoid lumps in your buttercream.
- White chocolate (6 oz melted for buttercream, 6 oz chopped for drip): Quality matters here; cheaper white chocolate can taste waxy, so choose something you'd actually eat on its own.
- Heavy cream (2-3 tbsp for buttercream, ¼ cup for drip): This gives both the frosting and drip their silky texture.
- White chocolate crispy pearls or malt balls (1 cup): These become your edible gold balloons and add a playful crunch.
- Edible gold spray or luster powder: A small luxury that transforms ordinary candies into something magical.
Tired of Takeout? 🥡
Get 10 meals you can make faster than delivery arrives. Seriously.
One email. No spam. Unsubscribe anytime.
Instructions
- Prepare your pans and preheat:
- Set your oven to 350°F and grease three 8-inch round pans with a light hand, then line the bottoms with parchment paper so your cakes slide out like they're supposed to. This step feels small but saves heartbreak later.
- Whisk your dry ingredients:
- Combine flour, baking powder, and salt in a medium bowl, making sure everything is evenly distributed. You're essentially pre-mixing so your batter comes together without overmixing later.
- Cream butter and sugar until pale:
- This takes about three minutes and is where your cake's texture begins; you're not just mixing, you're incorporating air that will keep your layers tender. Stop when it looks almost like fluffy clouds.
- Add eggs one at a time:
- Each egg should be fully incorporated before you add the next one, and they should be at room temperature so they blend smoothly. This creates emulsion, which keeps your cake structure stable.
- Alternate wet and dry ingredients gently:
- Start with flour, then milk, then flour again—the batter should come together smoothly without you overmixing and developing gluten. It's okay if it looks slightly thick; that's right.
- Divide and bake evenly:
- Use a scale if you have one to divide batter equally among pans, smooth the tops, and slide into the oven for 30 to 35 minutes. You'll know they're done when a toothpick comes out clean and the edges pull slightly from the pan.
- Cool completely before frosting:
- Let the cakes cool in pans for 10 minutes (they're still warm enough to set), then turn them out onto racks to cool all the way. Warm cake and buttercream are a soggy disaster waiting to happen.
- Make the white chocolate buttercream:
- Beat softened butter until smooth, gradually add sifted powdered sugar, then fold in melted white chocolate, vanilla, salt, and heavy cream until you have peaks that hold their shape. If it's too stiff, add cream one tablespoon at a time.
- Assemble with a crumb coat:
- Stack your first layer on a serving plate, spread a thin layer of frosting, repeat with remaining layers, then give the whole cake a thin frosting coat to trap any crumbs. Chill this for 30 minutes so it sets firm.
- Apply the final frosting coat:
- Take your cake from the fridge and apply a thicker layer of buttercream, smoothing the sides and top with an offset spatula dipped in warm water. This is where your cake starts to look like something special.
- Make the white chocolate drip:
- Heat heavy cream until it barely simmers, pour it over chopped white chocolate, wait one minute without stirring, then whisk until completely smooth. Let it cool to room temperature so it's the right consistency for dripping.
- Create the dramatic drip effect:
- Using a spoon or squeeze bottle, carefully drip the white chocolate ganache around the top edge of the cake, letting gravity do the work as it cascades down the sides. Fill the center smooth and let it set slightly before decorating.
- Prepare your gold balloon decorations:
- Spray your white chocolate pearls or malt balls with edible gold spray (or roll them in luster powder), let them dry completely, then insert toothpicks or thin cake wires through the centers. Arrange them in a festive cluster on top like actual balloons.
- Chill and bring to room temperature:
- Refrigerate the finished cake until serving time, but remember that white chocolate buttercream tastes best when it's not ice-cold. Let it sit out for 15 to 20 minutes before slicing so each bite is creamy and full of flavor.
 Save
Save I watched someone cut into this cake at their graduation party, and the way the white chocolate ribbons caught the light made everyone lean in closer. That's when I realized that celebration cakes aren't really about the taste alone—they're about creating a moment everyone remembers together.
Why This Cake Feels Special
There's an unspoken rule about milestone cakes: they have to look like you put real thought into them, but they can't taste like cardboard. This one walks that line perfectly because the vanilla is genuinely delicious underneath all the white chocolate elegance. I've learned that people remember how a cake made them feel way more than they remember the exact flavor, and serving something this beautiful makes everyone at the table feel celebrated.
The White Chocolate Factor
White chocolate gets a bad reputation from people who've only had the waxy supermarket versions, but real white chocolate is actually cocoa butter with milk solids and sugar—it's legitimate. Once you taste quality white chocolate melted into a buttercream, you understand why it became my go-to for special occasions. The key is buying it from a baking supply store or chocolate shop where you know someone actually cares about quality.
Making It Your Own
The beauty of this cake is that it's a blank canvas for personalization without needing to completely reinvent the recipe. You could add lemon zest to the sponge, use rose water in the buttercream, or swap the gold balloons for pearl dust and edible flowers. The structure stays solid as long as you respect the ratios and the techniques that make each element work.
- For extra vanilla intensity, add vanilla bean paste to both the sponge and buttercream.
- If gold feels too formal, use pastel-colored edible glitter or pearl dust instead.
- Make sure all your ingredients are truly room temperature or the batter will be uneven and your cake won't rise properly.
 Save
Save This cake has become my answer whenever someone asks what I bake for celebrations, and every single time feels a little like magic. There's something about marking a moment with something beautiful and delicious that makes the moment itself feel more real.
Recipe Guide
- → What type of chocolate is best for the drip?
Use high-quality white chocolate with at least 30% cocoa butter for smooth melting and a glossy finish.
- → How do I get a smooth vanilla sponge texture?
Cream the butter and sugar until pale and fluffy, then carefully alternate dry ingredients with milk to avoid overmixing.
- → Can I prepare the gold balloon decorations in advance?
Yes, you can spray and assemble the gold decorations a day before, storing them in a cool, dry place.
- → What is the best way to apply the white chocolate drip?
Use a spoon or squeeze bottle to gently drip the cooled ganache along the cake’s edges, allowing natural drips to form.
- → How should the cake be stored after assembly?
Keep the cake refrigerated and bring it to room temperature before serving for the best texture and flavor.