 Save
Save The first time I brought this to a potluck, my friend Sarah actually texted me the next morning begging for the recipe. She said her husband kept talking about it in his sleep. There is something almost dangerously addictive about warm peanut butter seeping through tender chocolate cake.
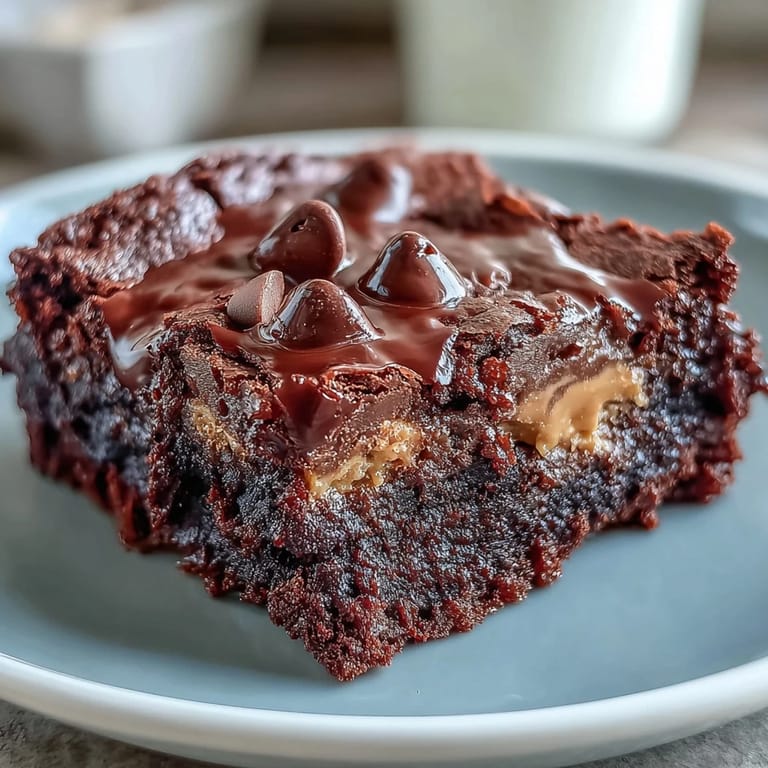
I stumbled on this technique during a chaotic Tuesday when I needed something impressive for book club but had zero energy. The way those mini peanut butter cups get all melty and create these little pockets of gooey perfection still makes me grin every time I pull it from the oven.
Ingredients
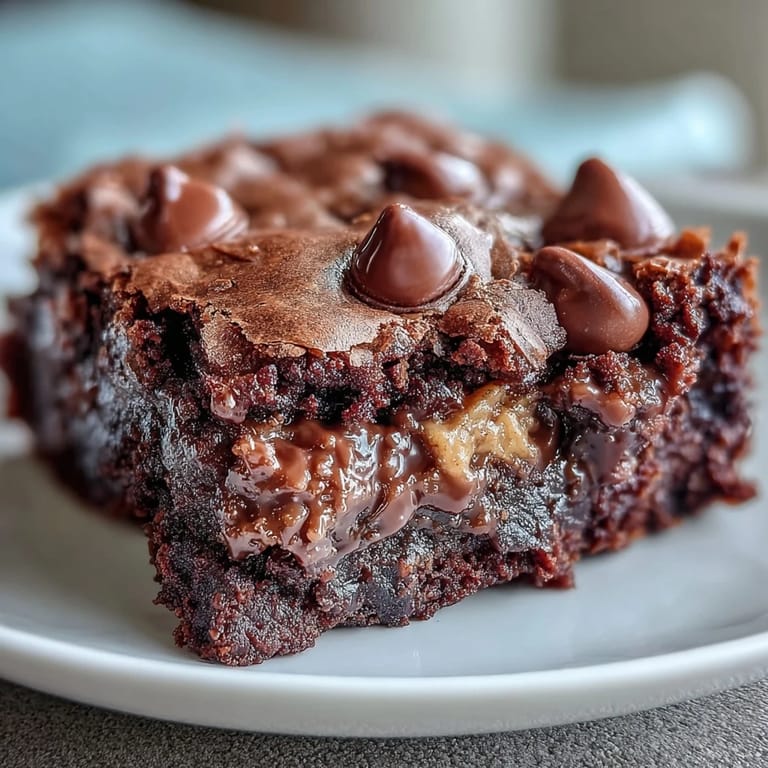
- Devils food chocolate cake mix: The deep chocolate flavor stands up beautifully to the peanut butter. Do not use milk chocolate cake mix here. Trust me on this one.
- Creamy peanut butter: Room temperature is crucial. Cold peanut butter will not spread evenly and you will end up with patches instead of that gorgeous smooth layer.
- Unsalted butter melted: Salted butter works too but reduce the salt elsewhere. The butter creates that rich tender crumb we want.
- Whole milk: I have tried lower fat milks. They work but the texture suffers. Whole milk gives you that bakery style moistness.
- Mini peanut butter cups: The size matters here. Regular cups are too large and do not distribute the chocolate evenly throughout.
- Semi sweet chocolate chips: These balance the sweetness from the peanut butter cups. Milk chocolate chips would push it into cloying territory.
Tired of Takeout? 🥡
Get 10 meals you can make faster than delivery arrives. Seriously.
One email. No spam. Unsubscribe anytime.
Instructions
- Get your oven ready:
- Preheat to 350°F and grease a 9x13 inch baking dish. Do not skip the greasing. The peanut butter wants to stick to everything.
- Create the secret layer:
- Spread your room temperature peanut butter in an even layer across the bottom. Take your time. Think of it as meditation.
- Make the batter:
- Whisk together the cake mix melted butter and milk. Tiny lumps are your friend. Over mixing makes tough cake and nobody wants that.
- Layer it up:
- Pour the batter gently over the peanut butter. Try not to disturb that bottom layer too much. It will look a little messy. That is correct.
- Add the treasures:
- Scatter those mini peanut butter cups and chocolate chips all over the top. Press them in slightly so they do not roll off.
- Bake until magic happens:
- 35 to 40 minutes. The center should be set but still moist. A toothpick with some crumbs is perfect. Clean means you over baked it.
- Patience pays off:
- Let it rest for at least 15 minutes. The peanut butter layer needs time to set up slightly. Warm scoops are heaven. Room temperature slices are neat.
 Save
Save Last Thanksgiving my usually stoic father in law took one bite and actually said wow. That might not sound like much but coming from him it felt like winning the Nobel Prize. Now it is requested for every family gathering.
Make It Your Own
Once you master the basic version the variations are endless. I have added chopped pretzels for a salty crunch. Swirled raspberry jam on top of the peanut butter layer for a PBandJ version. Each experiment teaches me something new.
Serving Suggestions
Warm with vanilla ice cream is the classic move for good reason. But I have also served it with salted caramel sauce for a dinner party that still gets mentioned years later. Cold for breakfast the next day is not something I will admit to doing regularly.
Storage And Make Ahead Tips
This actually tastes better on day two when the flavors have had time to deepen. I often bake it in the evening for an event the next day. The texture becomes even more fudgy and reminiscent of a gourmet brownie.
- Wrap tightly with plastic wrap touching the surface to prevent drying out
- Reheat individual pieces in the microwave for 15 seconds to bring back that freshly baked magic
- Freeze unbaked for up to 3 months then bake straight from frozen adding 10 minutes
 Save
Save Every time I serve this someone asks how I got the peanut butter inside the cake. That little secret smile when I explain it is the best part of making something this deceptively simple yet impressive.
Recipe Guide
- → Can I use natural peanut butter instead of creamy?
Natural peanut butter can work, but the results may vary slightly. Natural varieties tend to be oilier and less stable, which could affect the layering. Creamy peanut butter with stabilizers creates better layers and a more consistent texture throughout.
- → How do I know when the cake is done baking?
Insert a toothpick into the center of the cake. It should come out mostly clean with just a few moist crumbs attached. The top should be set and slightly firm to the touch, around 35-40 minutes of baking time at 350°F.
- → Can I make this ahead of time?
Absolutely! This cake actually tastes even better the next day as flavors meld together. Bake and cool completely, then cover tightly. Store at room temperature for up to 2 days or refrigerate for up to 5 days. Reheat individual portions in the microwave for 20-30 seconds.
- → What's the best way to serve this?
Warm is ideal - either freshly baked or reheated. The creamy peanut butter layer becomes perfectly gooey when warm. Top with vanilla ice cream for a classic contrast, or whipped cream for extra indulgence. For cleaner slices, let cool completely before cutting.
- → Can I substitute the cake mix?
Yes! Any chocolate cake mix works well - dark chocolate, German chocolate, or triple chocolate mixes would all be delicious. For homemade, use your favorite chocolate cake recipe equivalent to one box mix (about 15 oz).
- → Why is it called a dump cake?
The term refers to the simple preparation method where ingredients are layered or dumped into the pan without complex mixing. However, this version does require whisking the batter, making it slightly more involved than traditional dump cakes but still incredibly easy.